| Quantity | 0-3 | 4-50 | 51-100 |
| Discount | 0% OFF | 5% OFF | 10% OFF |
| Price | US$ 32.29 | US$ 30.68 | US$ 29.06 |


Copy and share this link on social network or send it to your friends
Copy| Product Name | FEICHAO Hub Program 10S Dual Motor Electric Skateboard Controller Longboard Drive ESC Replacement Control Remote Motherboard For Scooter |
| Item NO. | F45415 F45416 |
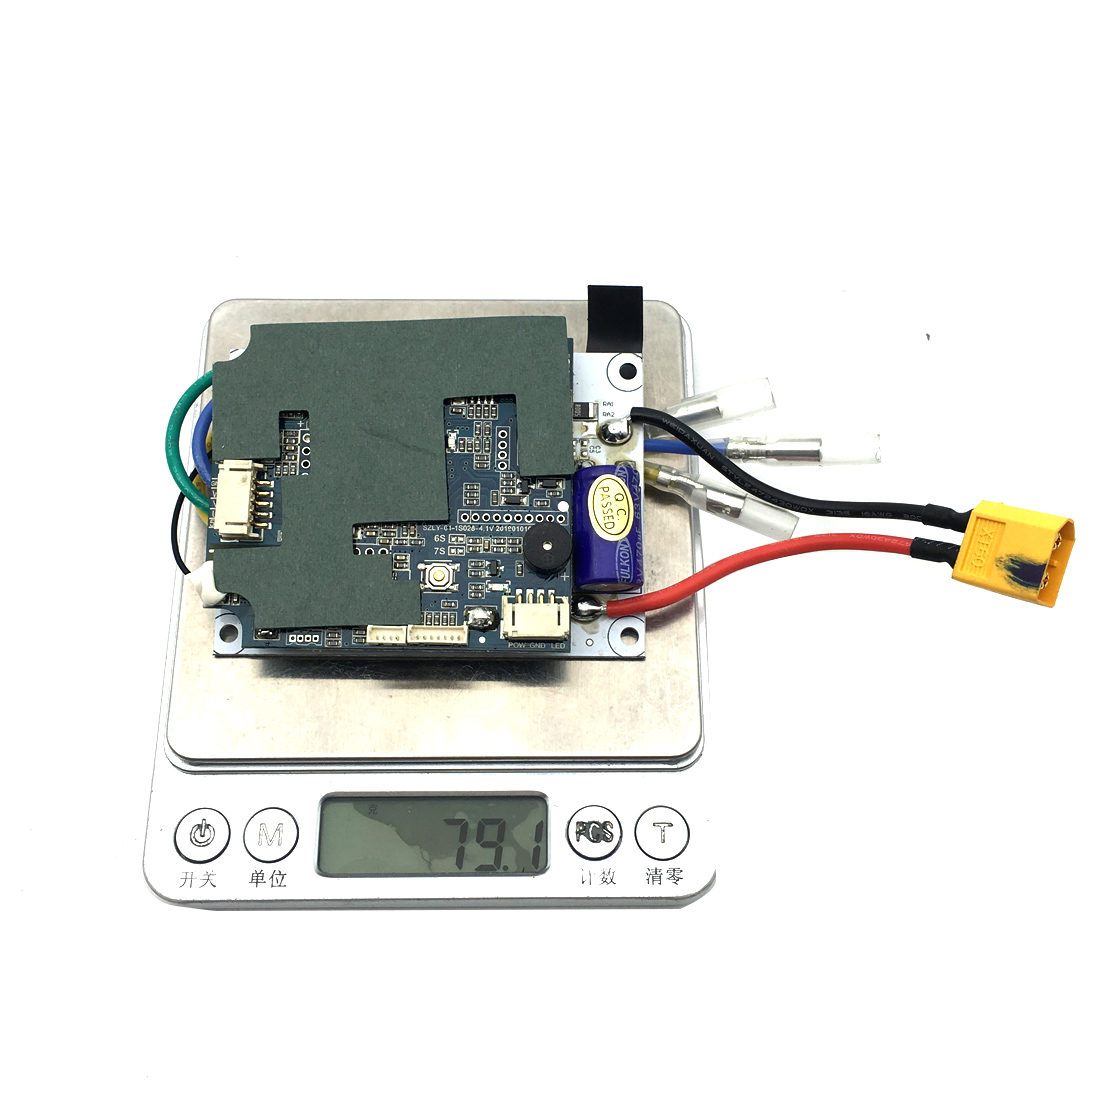
| Weight | 0.41 kg = 0.9039 lb = 14.4623 oz |
| Category | Outdoor Sports > Scooter |
| Brand | FEICHAO |
| Creation Time | 2021-12-14 |
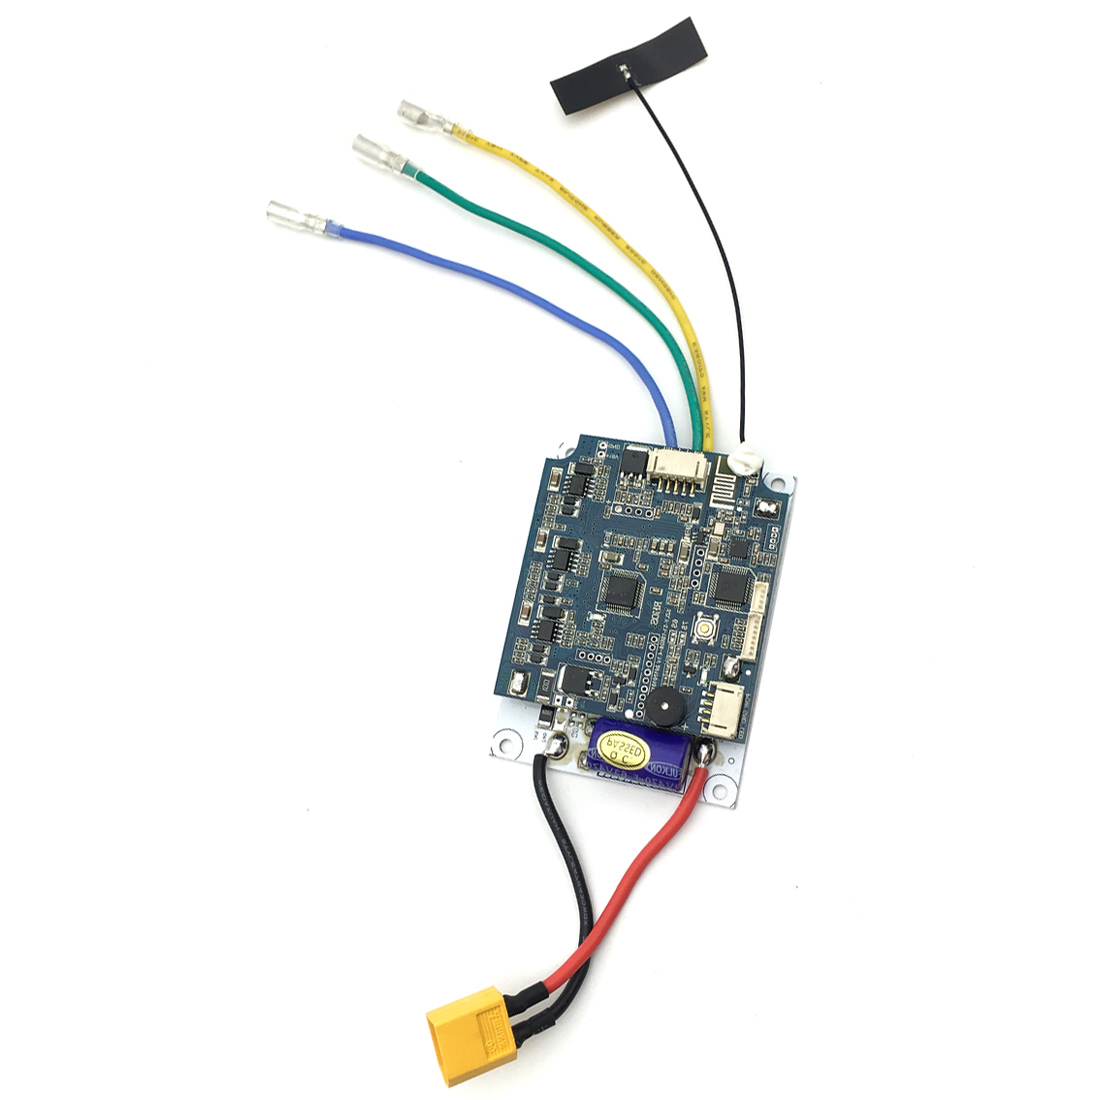
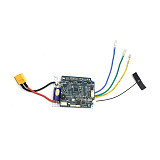
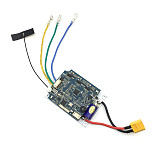
FEICHAO Hub Program 10S Dual Motor Electric Skateboard Controller Longboard Drive ESC Replacement Control Remote Motherboard For Scooter
Specifications:
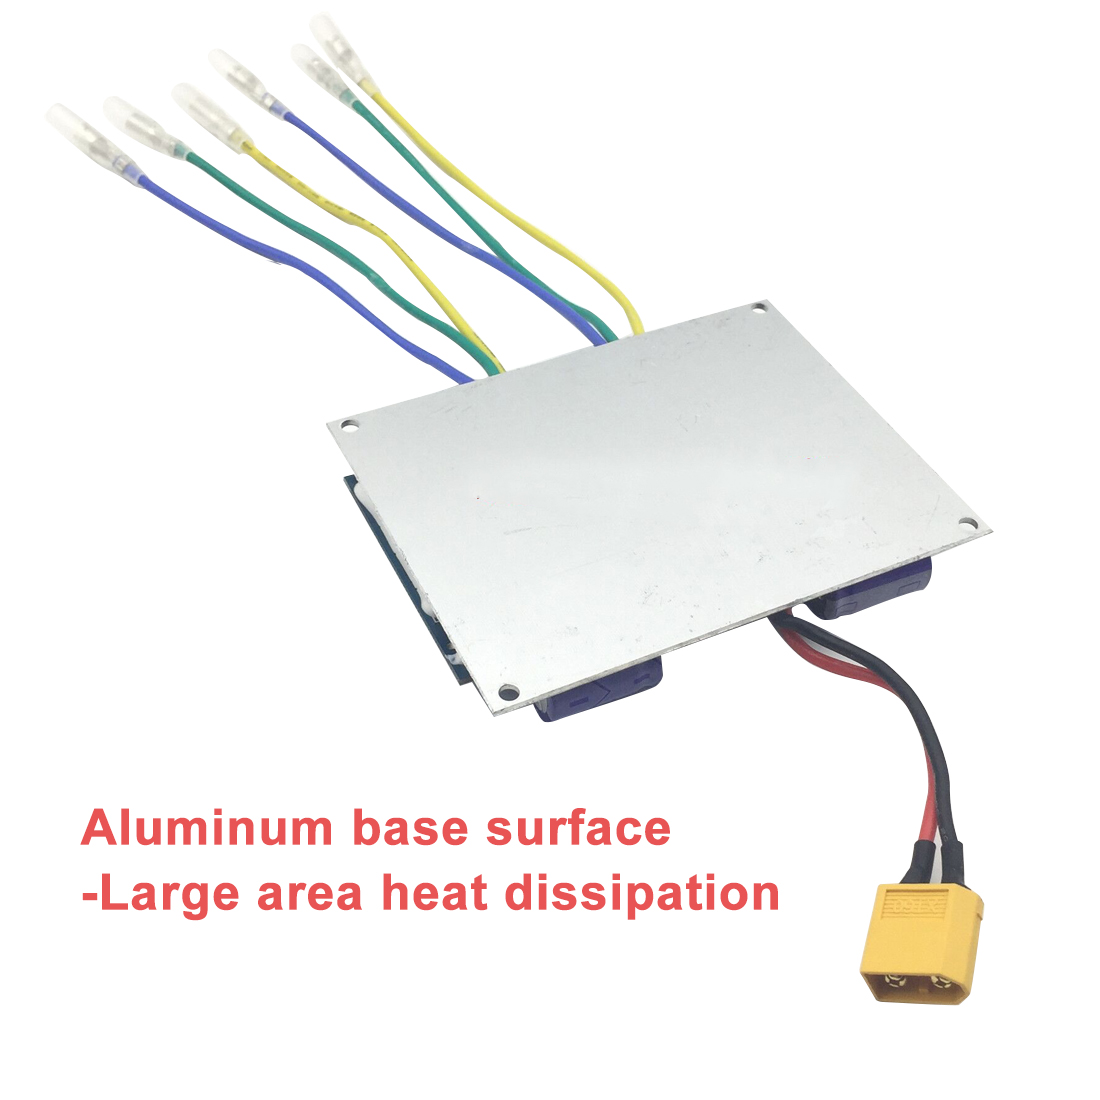
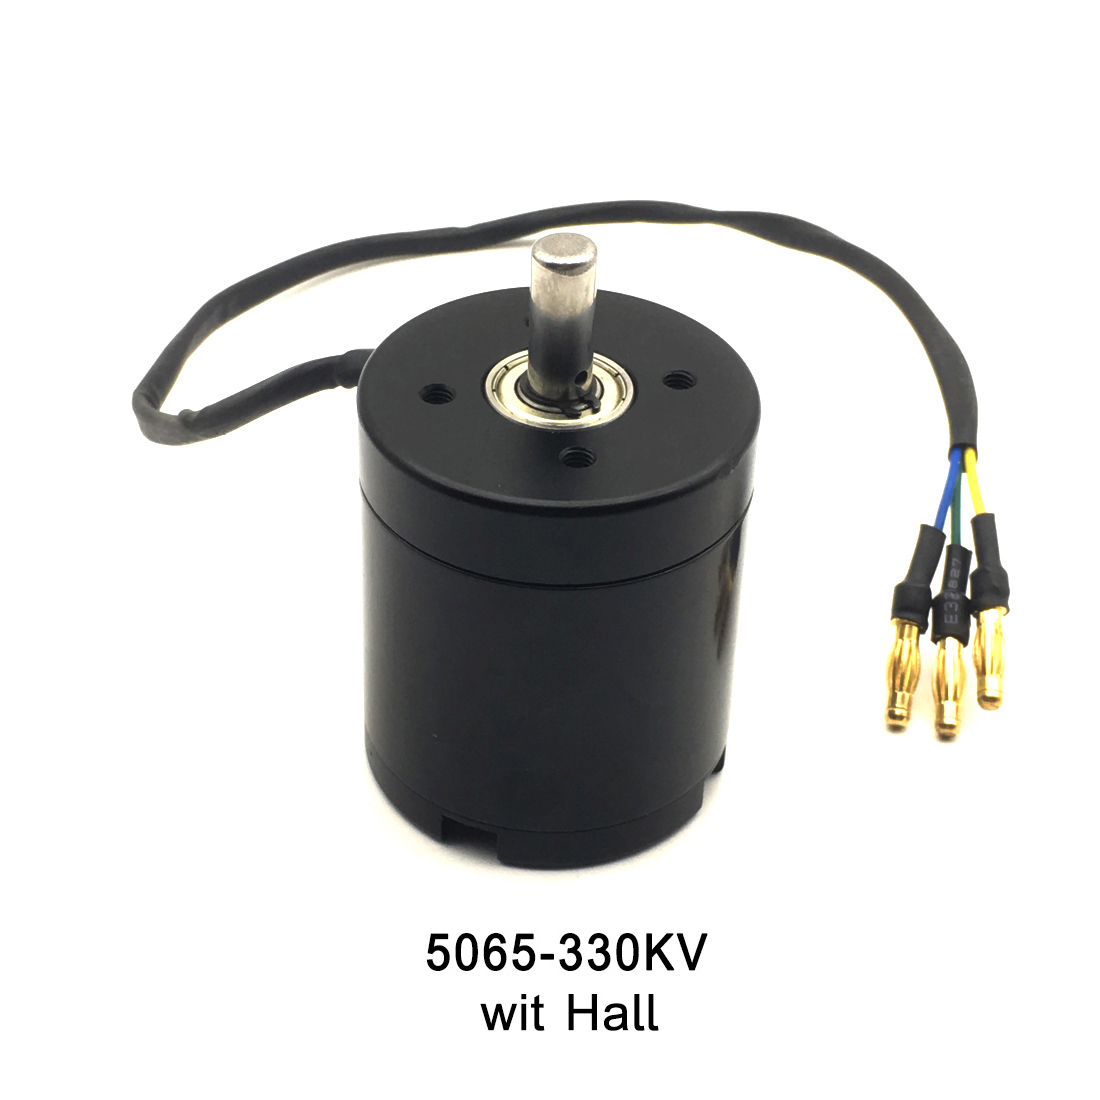
Dual ESC motor:
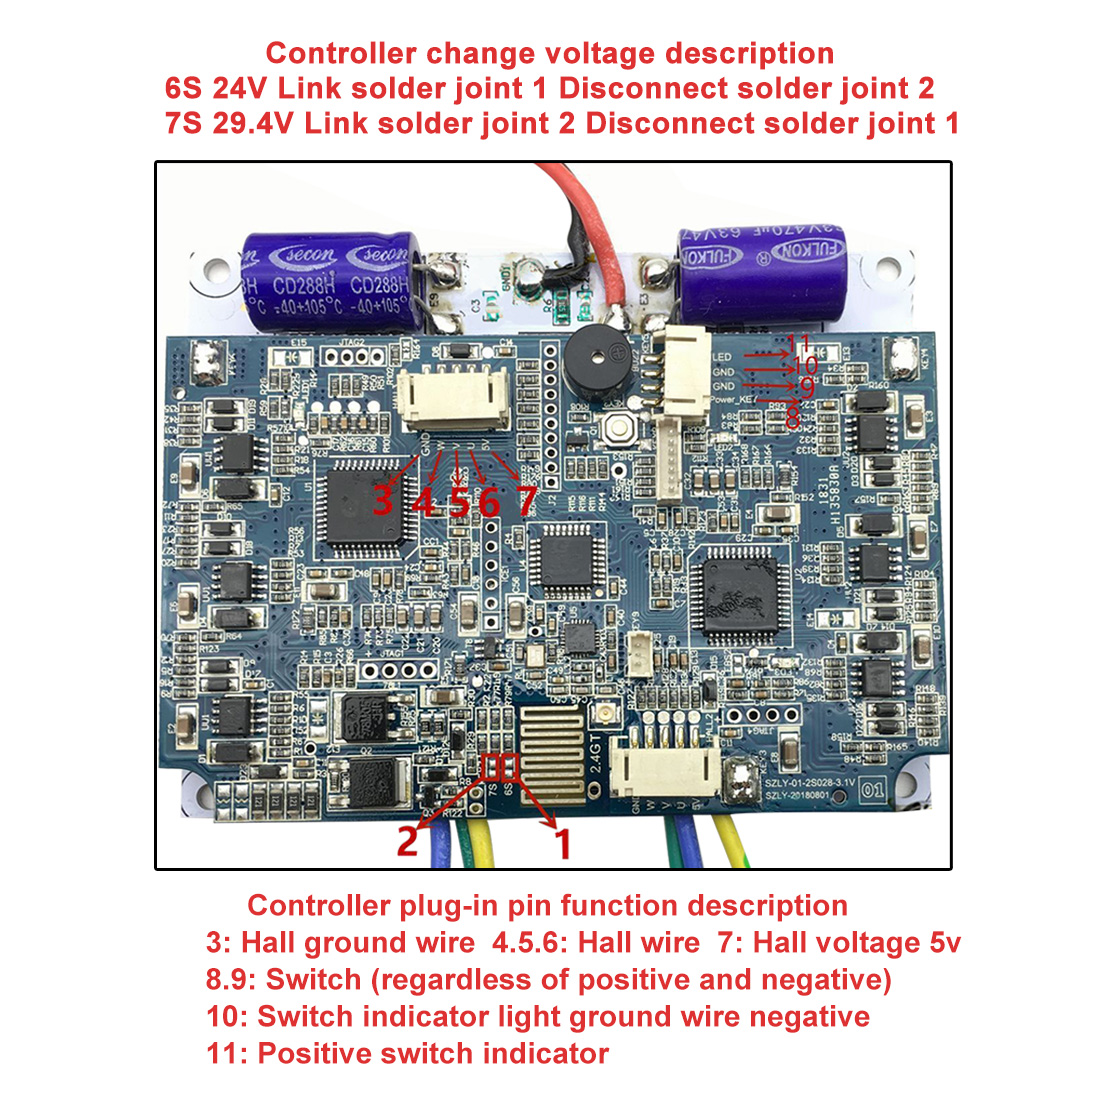
Nominal voltage: 24V / 29.4V / 36V
Current: 12a
Power: 290W (24V) / 430W (36V)
Rotation speed: 3000rpm
Maximum speed: 35 km / h
Drive mode: photo
Detection mode: hall
Maximum transport weight: 120kg
Protection: Overvoltage, Undervoltage, Overheating, Stop, CW / CCW, Overcurrent, Speed Control
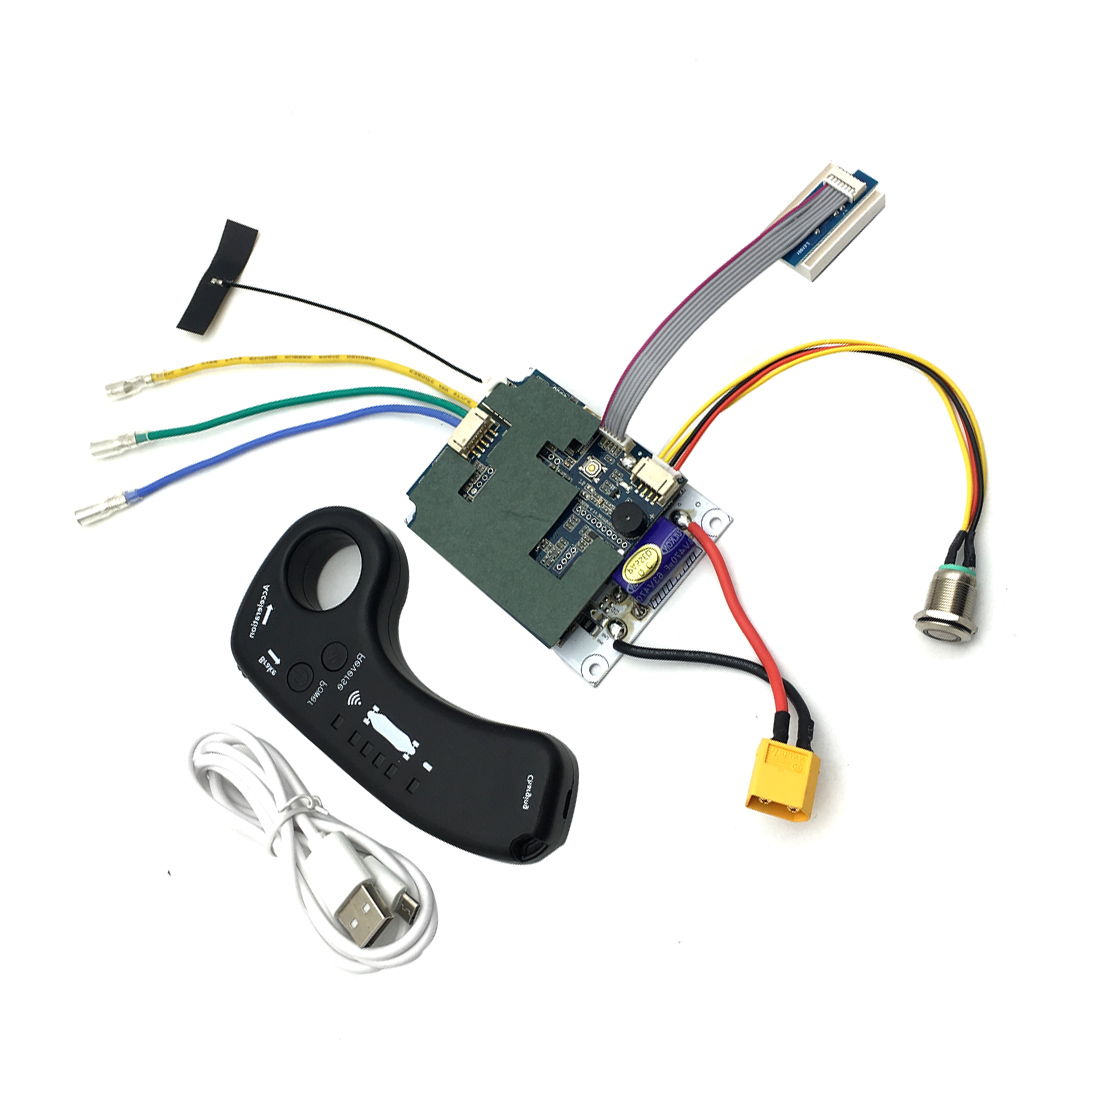
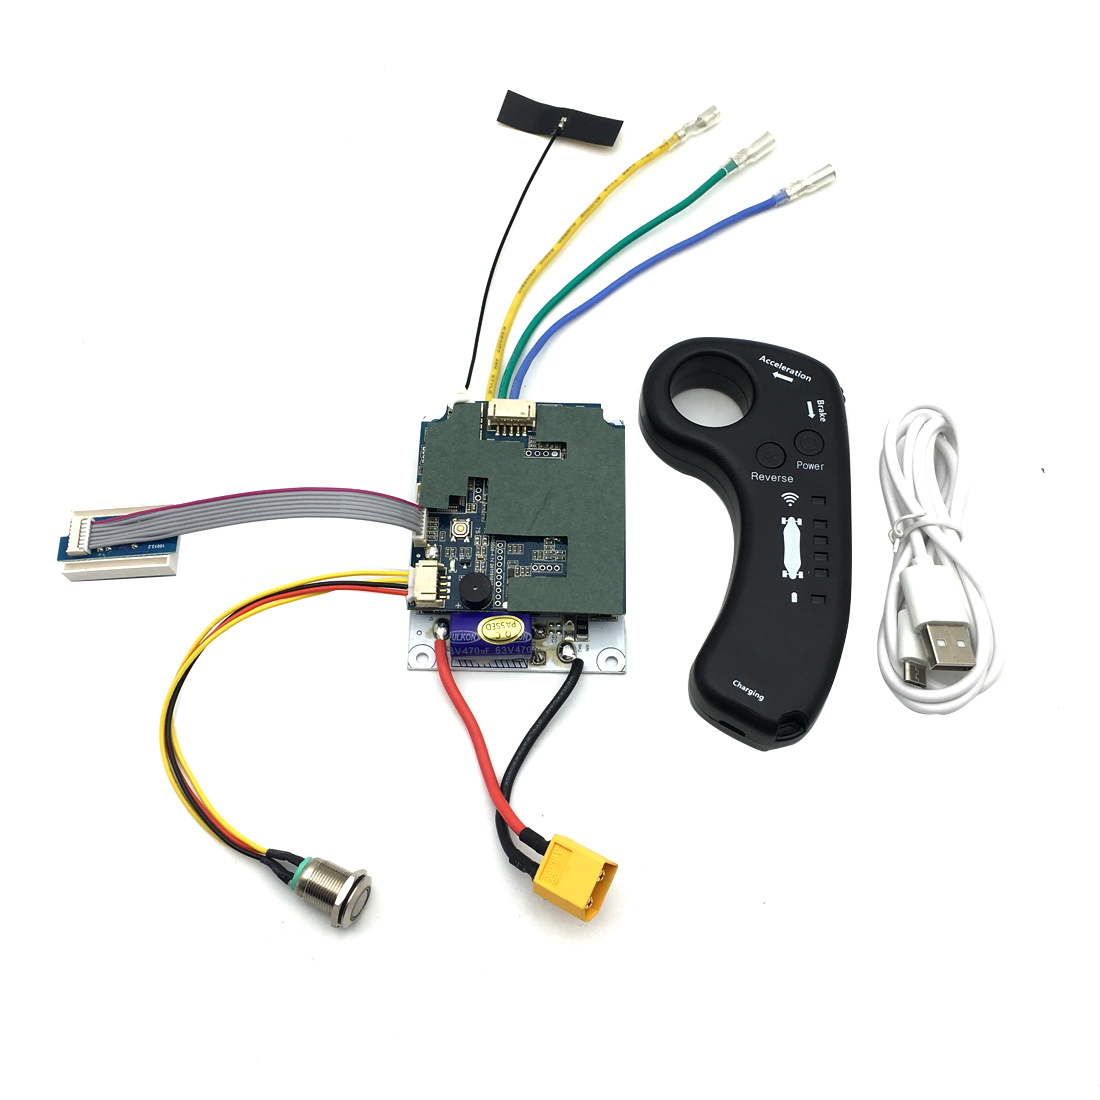
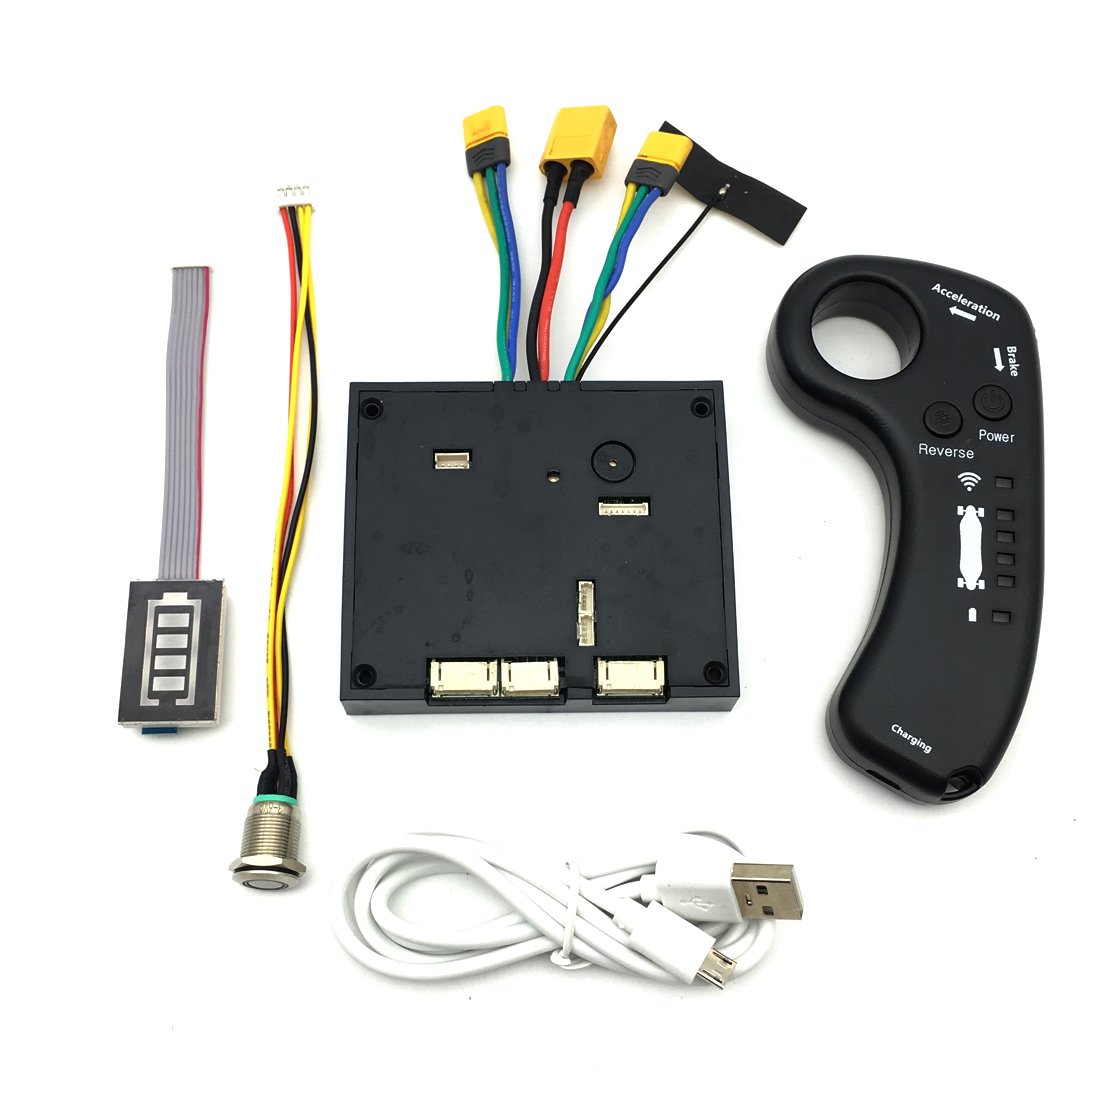
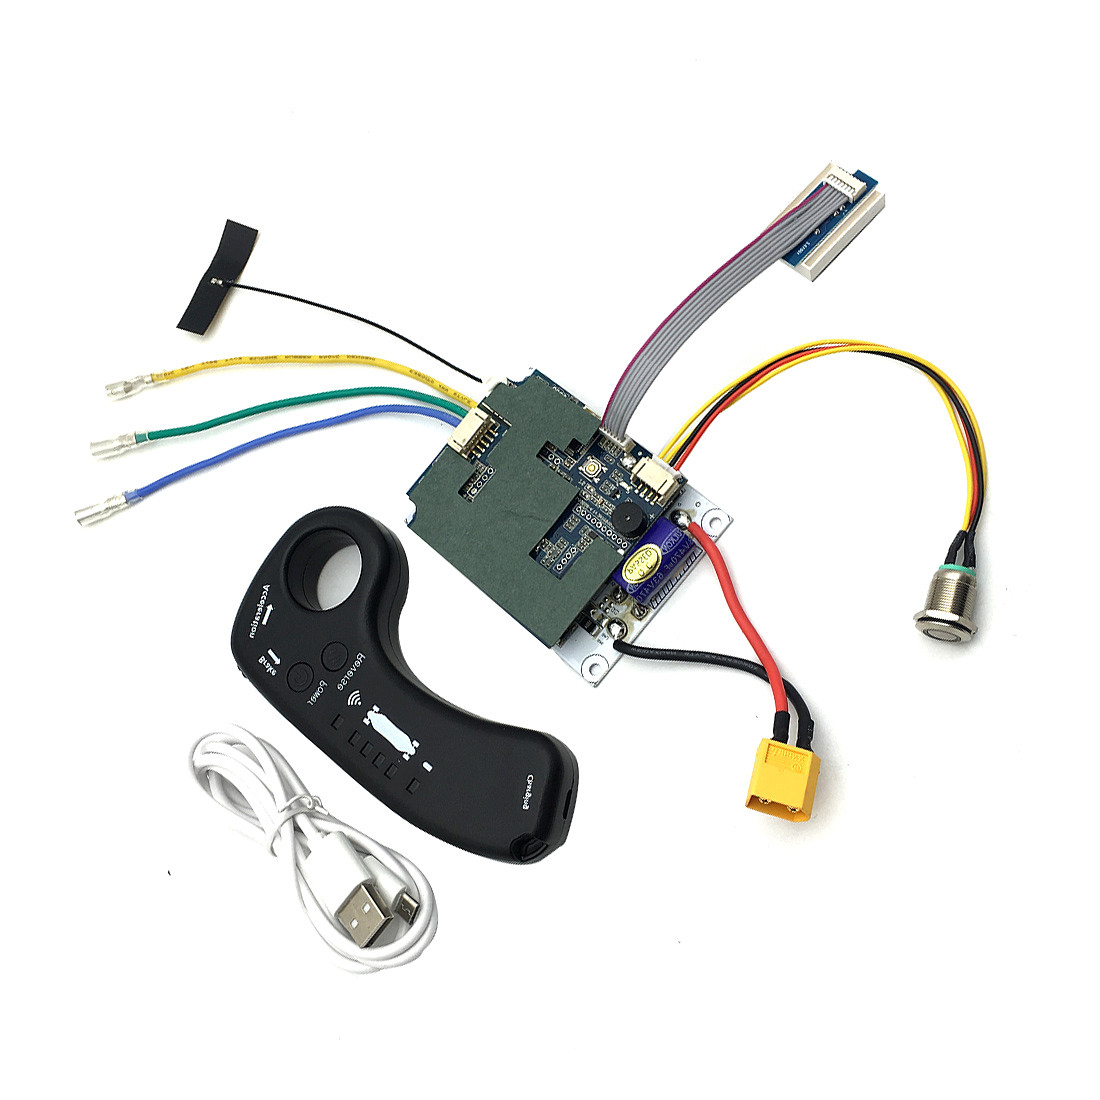
Package includes:
1 * electric speed controller
1 * Remote Control Transmitter (New Version)
1 * Battery LED Indicator
1 * switch
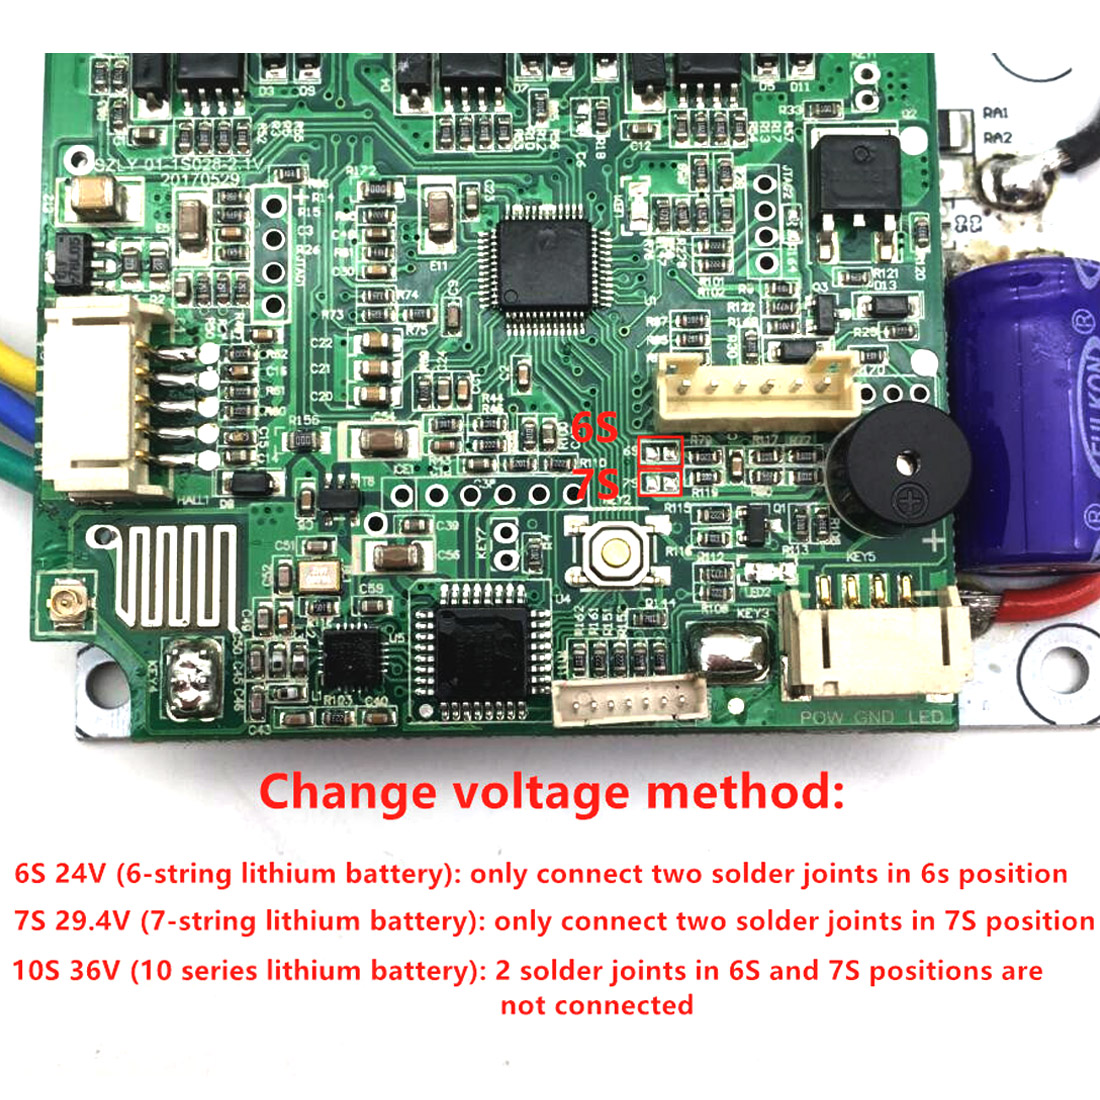
How to choose the correct controller:
1. Confirm how much voltage the battery has
6 string battery is 25.2V 7 string is 29.4V 10 string battery is 36V
2. Confirm the motor type
External motor chain, belt drive, Belt type controller
Hub motor, motor integral wheel, select the wheel type driver.
3. Confirm a single unit or four units
A controller drives a motor to be a single unit
One controller drives two motors to be a double drive
One driver drives four four-wheel motors
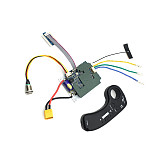
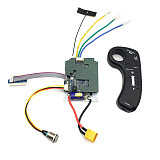
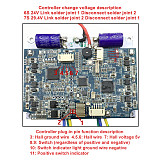
The remote control matches the main remote with a description of the signal:
1: connect main control to power supply
2: the power turns on, wait two seconds, then press and hold the key for about 6 seconds. Wait until the
switch indicator blinks.
3: Turn on the remote control switch and use a small screwdriver to press the button inside the small hole in the bottom corner
left of the remote control.
4: The remote control is turned off for two seconds and then turned on. Wait for the remote control signal light and the switch signal light
blink at the same time to indicate that the match was successful.
Note:
1. The controller board is a high precision circuit board. Do not touch the metal / liquid object to the plate before and during use to avoid
internal shorts!
24V ESC must use a voltage higher than 24V, the maximum voltage that can be used is 29.4V (ESC will not work below 24V)
36V ESC must use a voltage higher than 36V, the maximum voltage that can be used is 48V (ESC will not work below 36V)
2. Do not connect motor lines in parallel to allow a single unit to drive two motors.
Note:
-No Installation Guides Included, Professional Use Is Highly Recommended. We STRONGLY suggest that you ask your teacher to help you
this motherboard.
Wireless Controller Operating Instructions:
1. Controller start mode: the controller switch button has two lines, please connect this switch. When the controller is on
, press the switch and hear the sound: "drop", the control board flashes red, indicating that the control board has been activated.
Close the control board as above, press again is ok.
2. Control board and motor connection way: the rubber head motor of the three thick lines is the power cable, five side by side
with the thin line is the Hall detection line. For ease of operation, this controller setting is dual drive mode.
Just connect the three thick wires on the motor and controller board respectively (here the connection order is random), no need to connect
five fine cables (Holzer cable) ,. And the remote control motor can achieve smooth start and stop.
3. The five thin wires (Hall line) from the motor connect to other controllers if you need them later. If you need thin wires and you can use it.
Even if you do not use fine cables (Hall line), the benefits of this controller are that the controller board also works very well, more convenient to
use, the failure rate is low.
4. Hint: Do not connect the fine wires (Hall line) when testing. If the motor is choppy or spinning when the test starts, swap and connect
two of the three power lines.
Note: When the controller is powered on and tested, please do not touch the front of the controller board with more metal and do not touch with the above, it is
easy to short-circuit and burn the control board.
Do not let the front of the circuit board components have metal or liquid, it can also easily lead to a short circuit of the
circuit board.
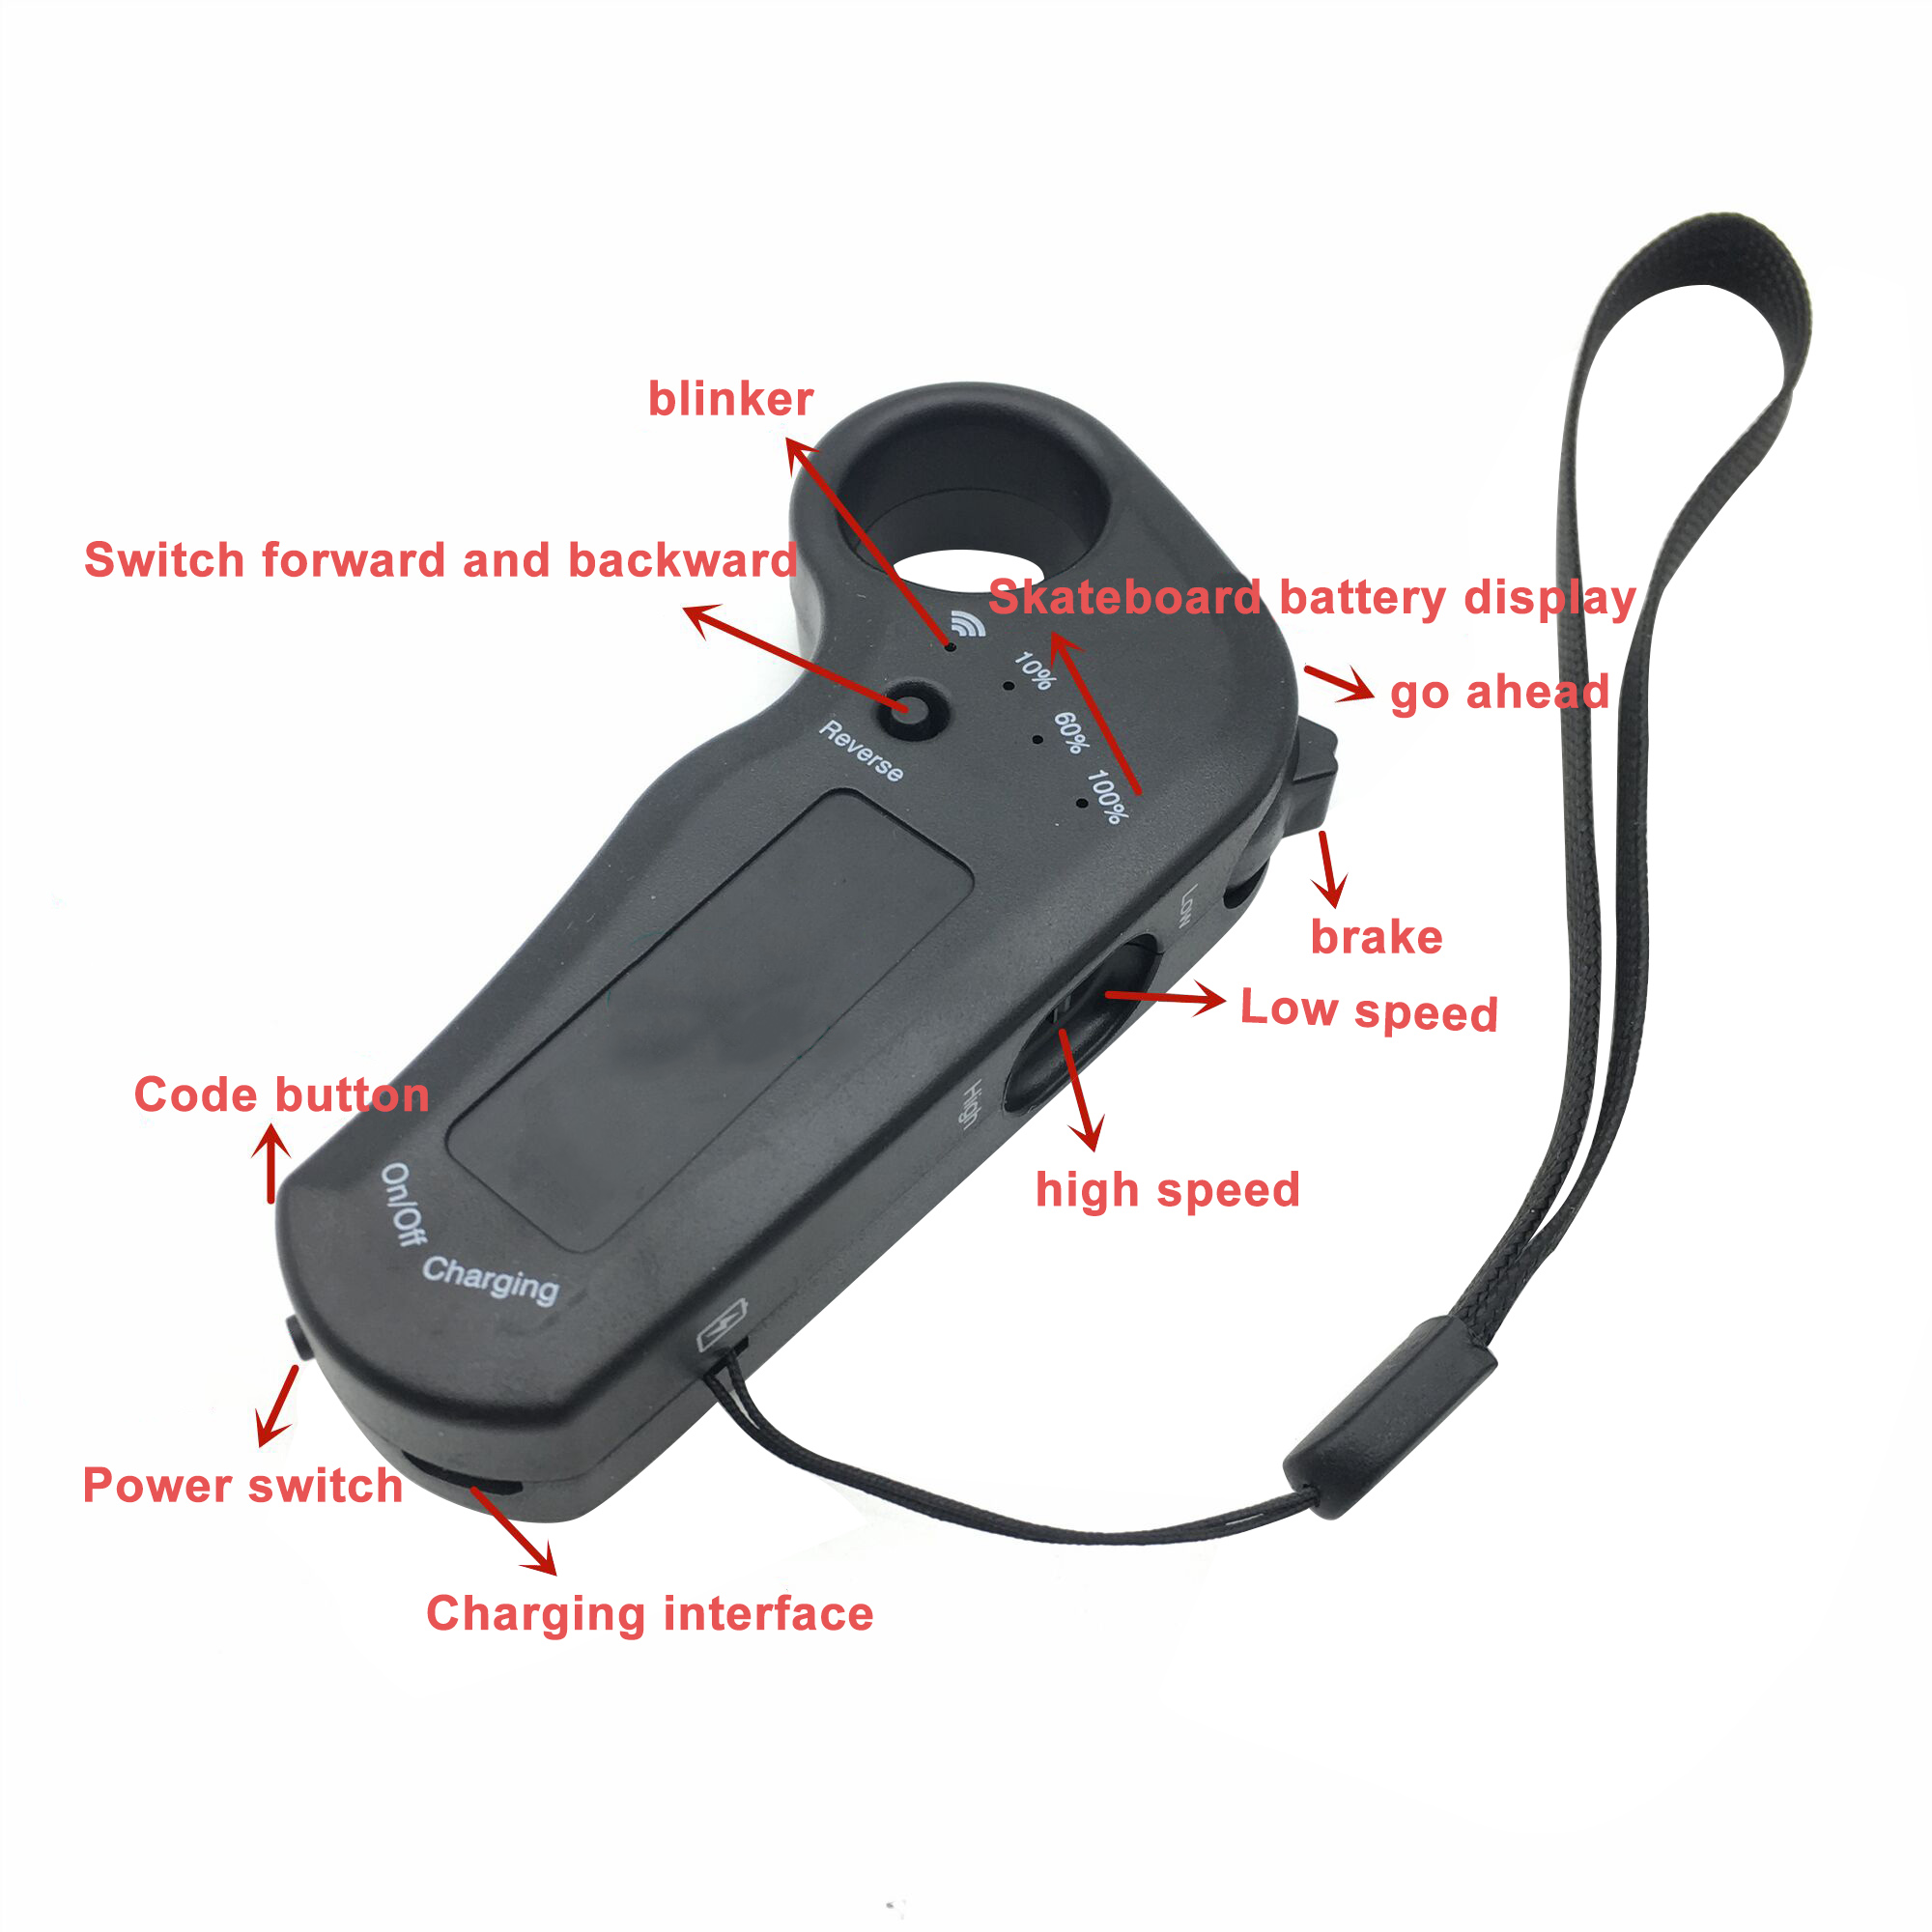
5. Remote control operation: Turn on the switch, press the forward and reverse switch button, the remote control and the controller
automatically match the connection. Press the slider button to accelerate the engine. After pulling the slider, the deceleration brake
the motor.
Here are two speed switches.
There are two directions of forward and reverse gear.
Remote Control: rechargeable, connected to the normal cell phone charging cable is fine.
6. Wireless remote control and control board connection operation:
①. Control board connected to power, at first, open the start button of the control board, and see the control panel flashing in
red, the control panel has been activated.
②. And then open the remote control switch on the remote control, at the same time, press the forward and reverse switch button, the
remote control flashes, the remote control has been opened, under normal circumstances, when the remote control and the control panel are combined
automatically and are well connected, No need to reconnect to control the remote control.
7. Connection mode: After opening the key on the control panel and the remote control, let the remote control move closer to the control panel and then
At first, press the connect button on the control panel. And then press the connect button on the remote control, then the
control panel quickly changes to regular flashing. Test that the connection is correct.


Note: short press the button means: press the switch will be released in about 1 second, long press the button means: press and hold the button without releasing it.
1. Specifications:
Name specification parameters
Battery Size 602030
Capacitance capacity 3.7V / 300MA
Charging time 20 minutes to charge 50%
Micro USB charging port
Weight 55g
2.4G multi-point hopping frequency communication mode
Open remote control distance 20M
OLED type screen
Screen size 0.96 inch / 15mm * 22mm
2. Description of functions
Turning on the remote control:
Press and hold the power button for 3 seconds to turn on, and the screen will light up.
The remote control is off:
Press and hold the power button for 3 seconds,
The remote control turns off automatically:
The remote control is not connected to the scooter and it will turn off automatically in 30 seconds. The remote control and the scooter will not turn off automatically if there is a connection between the remote control and the scooter.
Unit switch:
When the remote control is turned off and installed, press and hold buttons 1 and 2 to display the menu interface, press the 2-screen arrow to move up and down, and move the unit: KM / H MPH. The scroll wheel changes between kilometers and miles.
Wheel speed display setting:
When the remote control is off and installed, press and hold the n buttons. 1 and n. 2 to display the menu interface. Press the screen arrow # 2 to move up and down, and move to the wheel speed: 64. The number 64 behind is to adjust the speed and mileage of the remote control. The higher the number, the higher the speed display, the lower the number, the lower the display speed. The variable scroll wheel changes the size of the number, the up scroll wheel increases the number, and the down scroll wheel the number decreases.
Remote control screen content:
Scooter power, remote control power, ODO total mileage, single mileage record, maximum sprint speed record, hourly speed, forward / reverse display, speed gear, brake gear, communication indication, positive current acceleration, negative brake current,
Vibration reminder:
Vibrates once when turning on, vibrates twice when the skateboard is not connected, vibrates once by pressing the power button, vibrates once by pressing the reverse, vibrates once by pressing the power and turns off,. And it vibrates for a long time during error learning, and it vibrates twice when the power of the scooter is less than 10%.
Learning the middle position of the remote control:
When the remote control is off, press and hold the power button and the reverse button until the screen appears fine and the medium learning is successful. If it shows NG, it means that the median is not learned correctly and the vibration will continue to vibrate.
Turn on the lighting:
When the remote is on, press and hold the reverse button, the remote vibrates once and the light turns on.
Forward / Reverse Direction Switch:
Double click the power button, the screen will display FW-BW, it will vibrate once in forward rotation and vibrate twice in reverse
Pairing method:
First turn on the power of the scooter and then press and hold the power button of the scooter for 3 seconds. After the scooter indicator flashes once within 0.5 seconds, the scooter enters pairing mode. After turning on the remote control, press and hold the power and reverse function buttons at the same time for 1 second, just release, and the pairing is successful.
Password speed limit setting method:
When the remote control is off, press and hold the Power and Function buttons to enter the menu and release the Power button. Do not release the function buttons. After 5-8 seconds, there will be a number in the lower left corner of the screen. Second, after the number in the lower left corner flashes, shake the scroll wheel to adjust the speed limit gear, the throttle direction is +, the braking direction is-, the minimum limit is LO plus low, the best speed limit is Pro. (Do not release the function button during the whole operation, release the function button to exit the setting, the operation process will restart) Finally, press the power button to turn off and exit. (Optional for this function)
Scooter Battery Indicator:
The remote control is correctly connected to the scooter, as shown in the figure, the BO scooter power is divided into 4 segments ,. The full light is the power ("100% -75%"), (the first bar is off "75% -50%") the power, (the second bar is off "50% -25%") (the third bar is off "25% -5%") the battery power is less than "10% -0%", the fourth bar flashes for 0.5 seconds, and the remote control vibrates twice.
Remote control battery indicator:
Turn on the remote control power, as shown in the figure. The power of the remote control is divided into 4 segments. The full light is the power ("100% -75%"), (the first bar is off "75% -50%") the power, (No. The second bar is off "50% -25%") ( the third is off "25% -5%") when the fourth light is only within 5%, the remote control cannot be accelerated, but can only be braked.
Cruise mode:
Cruise at a fixed speed of 5-50 kilometers. During acceleration, short press the power button to display the list, enter the cruise, press the throttle, brake, and then press the next power button to exit the cruise.
Acceleration / brake:
Push the "roller" forward to control the slide forward and pull the "roller" back to control the slide brake.
Push the "roller" forward to change the speed gear and pull the "roller" back to change the brake force setting.
Scooter speed change:
When the scooter is stationary, or when the scooter is slipping, short press the reverse button to change the four gears of the scooter, low speed, MI medium speed, HI high speed ,. And Pro high speed.
Changing the brake force of the scooter:
Pull the "roller" back on the remote control and do not open it. At the same time, short press the reverse button to switch the four gears of the scooter's braking force, B-LO low-end braking force, B-MI, mid-range braking force. B-HI high-end braking force, b-pro sport braking force.
Charging the remote control:
The remote control is charged by Micro USB. After connecting and charging the remote control, the RM icon on the remote control indicates the charging status of the remote control.
Remote control battery protection:
When the remote control battery voltage is less than 5%, the battery voltage is less than 3.2V. Pushing the "roller" forward is prohibited. Pulling the "roller" back to brake is normal. , The remote control turns off automatically.
Note: When the power of the remote control is less than the last cell, it is better for the User to charge the remote control in time to avoid damage to the lithium battery due to over discharge.
Signal loss:
When the signal is lost, if the remote control accelerates, the scooter stops accelerating and the engine slides freely. When the scooter is in braking state, the signal is lost and the brake is still effective in 1 second, and it can be used again if it is reconnected in 1 second. After the signal is lost for more than 1 second, the acceleration will fail, the brake will fail, and the skateboard will equal free slide.


Email:yxy@xt-xinte.com
Wechat:15012645226


No related record found